Selasa, 22 Desember 2009

Share file dan folder dalam jaringan LAN

Artikel ini terinspirasi dari pertanyaan salah seorang pengunjung Belajar Ilmu Komputer yang menanyakan bagaimana cara mengirim data antar laptop yang sudah terkoneksi melalui wireless. Untuk artikel koneksi wireless antar laptop ke laptop (laptop to laptop connection) silahkan baca di sini.

Pertanyaan lengkapnya seperti ini : “kalo sudah terkonek, trus gimana cara untuk kirim-kiriman data atau share...Maklum gaptek and lagi mo belajar... Mmm kalo bisa kirim ke emailku wah*****@gmail.com Makacih banyak..."

Alamat emailnya sengaja disembunyikan demi privasi.

Sebenarnya perihal berkirim informasi atau data antar laptop ke laptop tidak berbeda dengan cara mengirim data antar hard drive ke hard drive, antar pc ke pc, antar folder ke folder yang sudah biasa dilakukan pada computer yang berdiri sendiri (stand alone).

Namun perbedaannya adalah apabila proses pengiriman dan penerimaan informasi dalam jaringan membutuhan ijin untuk berkomunikasi atau saling berbagi sumber data dan informasi. Ijin yang dimaksud adalah ijin penggunaan informasi dalam computer yang kita miliki.

Misalnya saya memiliki informasi data yang saya simpan dalam sebuah folder yang saya beri nama DATA. Folder DATA ini akan saya ijinkan untuk bisa diakses orang lain melalui computer yang berada dalam jaringan. Nah proses pemberian ijin ini dalam jaringan disebut SHARE.

Jadi apabila folder (atau bias saja file) yang hendak diberikan ijin untuk saling bertukar informasi harus dishare terlebih dahulu. Setelah di share barulah dilakukan komunikasi tukar informasi antar computer dalam jaringan melalui folder yang sudah memiliki hak akses (share).

Cara melakukan share pada folder dan file

Untuk melakukan sharing terhadap folder ataupun file caranya adalah sama, ada sharing yang dapat dilakukan dari command prompt dan ada juga yang dapat dilakukan dari windows explorer.
Di sini saya hanya menjelaskan sharing folder dan file melalui windows explorer.

Klik Start-All program-Accessories-Windows Explorer atau bias juga dengan cara yang lebih singkat klik kanan pada Start menu kemudian klik Explorer.
Dari windows explorer tentukan folder mana yang akan di share untuk digunakan bersama dalam jaringan, misalnya folder “data” (tanda petik dua hanya mempertegas kata). (lihat gambar)
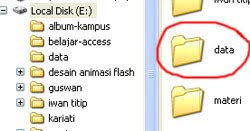


Gambar diatas jelas terlihat folder data yang belu di sharing
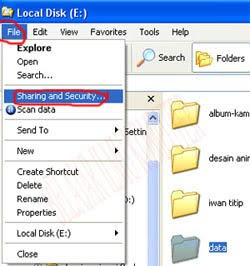


Contoh yang dapat dilihat pada gambar di atas, kita akan melakukan sharing pada pada folder “data”. Caranya klik satu kali pada folder “data” kemudian klik menu File-Sharing and security sehinga muncul jendela seperti berikut.
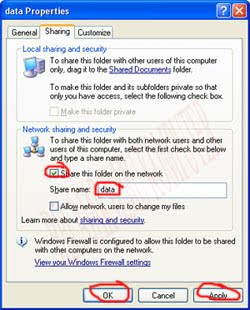


Berikan tanda centang/contreng/rumput pada tulisan atau pilihan Share this folder on the network, kemudian share namenya boleh diubah atau bias saja tetap menggunakan nama “data” (nama yang ditulis di sini yang akan terlihat di computer lain dalam jaringan).
Dan akhiri dengan klik Apply kemudian OK atau langsung saja klik OK, sehingga hasil akhirnya folder data akan menjadi seperti gambar berikut.

Sampai di sini masih sebatas memberikan ijin folder atau file sedangkan praktek untuk mengirim ataupun menerima data, atau menggunakan sumber daya bersama silahkan baca terus artikel ini.
Melakukan komunikasi antar folder yang sudah di sharing.

Jalankan windows explorer, caranya sama seperti melakukan file dan folder sharing tadi, kemudian pada address ketik \\namakomputer.
Misalnya kita akan melakukan komunikasi data antar komputer1 dan komputer2 maka ketik pada address bar di windows explorer \\komputer2 (dilakukan di komputer1). maka semua isi folder (file-file) yang ada di komputer2 dalam folder data yang sudah disharing tadi akan terlihat di komputer1. Selanjutnya silahkan mengambil data dari computer 2 degan cara mengcopy dan pastekan di salah sati drive computer local.

Artikel kali ini tentang belajar adobe cs bagaimana cara membuat efek bayangan dalam air. Untuk memulai membuat bayangan dalam air terlebih dahulu sediakan satu buah objek yang nantinya akan diberikan efek bayangan dalam air.


Langkah pertama adalah buka objek gambar yang akan diberi efek bayangan dalam air (seperti gambar di atas) kemudian ikuti langkah berikut :

Karena yang saya gunakan di sini adalah objek gambar dengan ukuran 300px kali 225px. maka saya harus menambahkan ukuran kanvas pada bagian bawah objek gambar sebenarnya sehingga nantinya menjadi tempat ditempatkannya bayangan dalam air. Bila anda menggunakan ukuran objek gambar yang berbeda tinggal menyesuaikan saja dengan ukuran objek tersebut.

Tambahkan tinggi kanvas menjadi dua kali ukuran sebenarnya dengan cara klik menu Image - Canvas size maka akan muncul jendela canvas size sperti berikut :


Kemudian tentukan ukuran dalam format pixels (lihat gambar) setelah itu klik di bagian atas kotak anchor, ini dimaksud agar bagian kanvas yang ditambahkan adalah bagian bawah objek gambar sehingga hasilnya akan menjadi seperti gambar berikut ini. (perhatikan gambar dengan teliti dan lihat perbedaannya).


Klik OK sehingga hasil gambarnya akan menjadi seperti berikut :


Tekan tombol Alt + Shift (tanpa tanda plus ya...) kemudian gunakan Move Tool klik dan geser obyek atau gambar tersebut ke bawah sehingga akan menjadi seperti berikut :


Langkah selanjutnya adalah membalikan gambar tersebut secara vertikal sebesar 180 derajat karena bayangan dalam air adalah terbalik dengan objek sesungguhnya, caranya Gunakan Rectangular Marquee Tool untuk memilih area gambar duplikat (gambar bagian bawah) kemudian klik menu Edit -transform dan klik Flip Vertcal sehingga gambar akan berubah seperti berikut :


Klik menu Filter - Distort - Polar Coordinates kemudian pilih Rectangular To Polar dan klik OK
Klik menu Filter - Distort - ZigZag dan atur amount -8 dan ridges 5 kemudian klik OK
Klik menu Filter - Distort - Polar Coordinates kemudian pilih Polar To Rectangular dan klik OK sehingga hasilnya akan menjadi seperti berikut :


Klik menu Image - Adjustments brightness - Brightness/Contras dan ubah brightness menjadi 0 dan contras -50.
Klik menu Select kemudian pilih Deselect sehingga hasil akhirnya akan menjadi seperti gambar berikut :


Langkah-langkah untuk membuat bayangan dalam air sudah selesai, selamat berkreasi, semoga artikel belajar photoshop ini bisa bermanfaat bagi pengunjung blog belajar ilmu komputer.

Receiving Payments Second AdsenseCamp


Virtual world really provide land or place of work was encouraging, supported by the development of computer technology with the Internet network and the broader use of the Internet so that more entrepreneurs to promote their products via the internet.

The ads promoted through the Internet is very effective because of easy access to the Internet either using desktop computers, laptops or mobile users (cell phone). Even that did not have computers and mobile phones also have the opportunity to access the Internet through Internet shops are scattered everywhere with a very affordable price ranging between 2500 to 5000 rupiah per-hour.

With the ease of getting money from the internet is not wrong if we try to fortune through the internet by taking advantage of capabilities present in each of us like what I have to do now is to be a blogger.


By becoming a blogger I've proved that many times get paid from some programs PPC (pay per click) such kumpulblogger and adsensecamp. Special payments from adsensecamp is the second payment because I had recently joined adsensecam.
On Wednesday, December 2, 2009 date of yesterday I get a transfer of money a second time worth more than 12 thousand dollars for advertising adsensecamp.

Apart from adsensecamp transfer, the transfer also comes from kumpulblogger the average value over 10 thousand dollars each week and even twice a week to get the transfer from kumpulblogger. For those who already have a blog but have not advertised kumpulblogger immediately register a blog and put ads can read how to advertise here kumpulblogger. As for adsensecamp advertise please click here.

While for those who do not have a blog does not hurt to make your blog with free facilities such as blogger.com (blogspot). Not yet know how to please read the article How to quickly create a blog with blogspot.

ideo Convert Master

Video Convert Master merupakan software video converter yang memiliki kemampuan untuk melakukan konversi, split, dan merge file-file video. Hampir semua jenis file video di dukung oleh software ini, macam AVI, MPEG, MPEG 1, MPEG 2, MPEG 4, VCD, DVD, SVCD, RMVB, RM, WMV, MOV, DIVX, 3GP, MKV, FLV, dan lain-lain.

Output yang di dukung program ini juga banyak macam AVI, MP4, 3GP, MPEG, MOV, WMV, RM, SWF, ASF, VOB, AAC, AC3, MP2, MP3, AMR, Wav. Tidak hanya file video yang bisa di convert, jenis file audio juga mampu di convert. Dari satu jenis file output yang di pilih, kamu bisa menentukan sendiri tipe codec yang di inginkan. Misalkan merubah ke format MP4, dari bagian Profile bisa di pilih MP4 untuk ipod atau PSP. Atau merubah ke format MPEG, dari bagian Profile kamu bisa memilih tipe MPEG untuk DVD, VCD, SVCD format PAL atau NTSC.

Video Convert Master screenshot

Cukup empat langkah untuk mengoperasikan program ini:
Mengambil sumber file video yang ingin di convert
Menentukan jenis file output
Menentukan destination (tempat menyimpan hasil file yang di convert)
Klik tombol Convert untuk memulai konversi

Terintegrasinya DVD burning tools menambah kelebihan program ini. Memudahkan untuk urusan membuat menu dvd sebelum hasilnya di burn ke DVD dan di mainkan pada DVD-player, PC, atau laptop.

Selasa, 15 Desember 2009

comparison sites e-tailing

Compare your E-tailing: Amazon.com, Barneandnoble.com, Mizan.com, Bhinneka.com, and Fastncheap.com
Amazon.Com
In terms of appearance, more apparent amazon.com luxury and a wide space with a large impression. When he first entered, the first impression that may arise from the user, this site is fun to create an online shop, so that the users are welcome to browse or surf at amazon.com. Products shown are grouped according to categories provided by amazon.com. And the advantage here is that always looks new or updated continuously. For example, the author first browsing on Thursday, March 19, 2009 at 14:00 o'clock WB. However, at 21:00 o'clock on the same day, the appearance has changed with the new product and even better than before. The same thing happens when browsing is back on the next morning. Another advantage is this site in the image rather than writing. Each product is represented with displays offer the product itself. Thus, users who want to buy products, especially new products, do not have wished what shape or color of the new product.
However, from every view display, the product is not always accompanied with a listing price. With demikan, "forcing" the user to click the product if the user wants to know the price offered. When it entered the desired product, the user again faced with an attractive share option. For example, we are interested in new items on offer, such as the iPod. So, not only the iPod that we click as that appears, but many other types of iPods and other MP3 players come displayed. This is possible because the iPod was entered in the class catalog MP3 Player in amazon.com. When you have entered into categories that, then came the price offered. The price offered was already made in such a way that the product attractive to buy soon. There are display the original price (list price) and purchase a special special prices on amazon.com (our price) with information that can be saved costs when customers buy in amazon.com.

Barneandnoble.Com
In contrast to amazon.com, when he first entered the site, the first impression that emerges is boring. This is because the product display layout of the meeting with a little space and too much writing. Many of the writing here means, the product is not represented by an image or display the product itself but with the information in the form of text. This is particularly troublesome because the user or a new customer who wants to buy should be bothered with looking carefully at where the product about which they want even if there are catalogs or the desired product category.
Talking about the category or product catalog offered, barneandnoble.com less diverse. Different from amazon.com which have diverse catalog ranging from the most frequently searched yamg to the most often sold online, such as sports equipment and jewelry. In other words, amazon.com has the direction of e-mall where the products are complete starting from education, entertainment, lifestyle, electronics, office buildings, housing, children, adults, teenagers, to the products environmentally friendly. So far with barneandnoble.com proportionate. which in fact have a complete product, but does not apply one-stop service. This system was in amazon.com, where customers are likely to get what they want.
However, barneandnoble.com has the advantage of setting prices or supply. The site is set three price levels, the market price, the price barneandnoble.com version, and a special member price of significant difference from each level. This price difference may be barneandnoble.com weapons in the future to attract new customers. Because, inevitably they will go become a member just to get a cheaper price. Thus, customers will automatically increase.

Bhinneka.com
Display bhinneka.com site for class sizes exactly luxurious and very attractive. The first impression that comes when entering these sites is this site for computer products, laptops, PDAs, cameras, and products related to computers such as LCD, software, antivirus, and other products belonging to the gadget. And the other impression that arise when entered, the site seemed intended for the upper middle market segment, or even upper-class sort. This is reinforced by the performance of the average price in dollar size. However, those who feel no class, no need to worry because bhinneka.com provide mortgage credit system with the BCA. Products offered are not playing games. The average item here is a product with a famous brand and the public is known as an expensive product, such as: HP, Apple, iPod, iPhone, Microsoft, DEL, and so forth. What's interesting about this site is in addition to classifying products bhinneka.com general, bhinneka.com also classify the product of the price level, brand, and product categories which are classified as the most recent, highly sought, and limited edition.

Fastncheap.com
Almost the same as bhinneka.com. This site has an interesting view that not even semewah bhinneka.com. The first impression that comes when entered in this site is a complete site for computer products, for products categorized separately from the computer itself. In other words, this site is specifically for selling computer equipment in full. For example categories, such as monitors, input devices, memory, processor, and so on. The excess of the sites is the view of the customer's comment (comments of our customers) that it fastncheap.com gratitude to the product they've received the message in good condition. The existence of this comment look into free promotion for their first-time entry and want to transact online. Therefore, given this comment, new customers more confident that the transaction in fastncheap.com secured. To view price, set prices in Rupiah. And another advantage is the products offered by various brands, ranging from famous brands as well as the community known as the brand for a cheaper alternative. It's just an interesting view of this, or just outside the main page of fastncheap.com. When we begin to enter in each category, for example, we select the memory, then the show is a list of memory in the form of text (list). This is quite boring for those who do not know how memory is needed. But, if we hesitate, just click the desired memory to view the information.

Mizan.com
Mizan.com an effort mennggeluti site books are sold online. The core business is the Islamic books, but this site also provides other books that tergo; ong nonfiction, sri business, or other categories of books. Unlike the sites above, these sites look very simple, but not cheap. The first time we went in the main view, then we are treated to a short story or a summary of some books. Kananya displayed next to the list of recent books and bestsellers with unit price in IDR and short stories from the book.

internet developments in the world

Currently, the Internet has become a requirement for masyrakat in general because with the Internet, they can access and find all information around the world quickly and easily. Internet needs a very important so that an increasing number of internet users every year who are always growing throughout the world. Population of Internet users in the world in the year 2008 experts have exceeded 1 billion users. The development of rapid Internet makes the Internet user population figures in the world increased sharply. Countries with large population like China and India took part in the increase in Internet user population in the world. However, the population of the world's Internet users reached only 15 to 22 percent of the total world population of about 6.75 billion people.
Here are the data of Internet users in the world is divided by country and region:
A. The five countries with the largest population of Internet users:
1.Cina: 179.7 million
2.Amerika States: 163.3 million
3.Jepang: 60.0 million
4.Jerman: 37.0 million
5.Inggris Kingdom: 36.7 million
6.Perancis: 34.0 million
7.India: 32.1 million
B.Wilayah / continent with the largest Internet population:
Asia Pacific: 416 million (41.3%)
Europe: 283 million (28.0%)
North America: 185 million (18.4%)
Latin America: 75 million (7.4%)
Middle East and Africa: 49 million (4.8%)
Figures 1 billion Internet users are menajubkan sufficient numbers. Seeing these numbers could be huge momentum for unification sebgai community of Internet users around the world. And to keep in mind, this figure could still grow in line with the expected advances in technology can reduce operational costs in the internet. Thus, not only developed countries are able to utilize internet maksikanl, but also countries that are still developing and growing. One source in the internet also mention that the average age of the Internet users are users with the age of 15 years and over with the use of most personal computers (PC = Personal Computer) and enterprise computers.
While in Indonesia itself, the internet user is quite a bit. Different from his mobile phone users. This was stated by Minister of Communications and Information Mohammad Nuh. Of Indonesia's population today, Internet users is only about 14.4 million users, or only about 6% of the total Indonesian population. Internet users far behind than the mobile phone users by 60 million people from a total population of Indonesia. Therefore, not surprising that Indonesia is not included in the list of most Internet users despite Indonesia's population is big enough.
In order to increase the number of internet users in Indonesia, still requires hard work and tenacious effort to achieve it. However, along with the increasing need for information, the need will increase as the Internet, facilitating the growth of internet business in Indonesia. This effort is also strengthened with the help of the government through the development of fiber-optic cable along the East Indonesia 10,000 kilometers. As reported by Tempo, the total investment reaching Rp 4 trillion. Meanwhile, the Indonesian territory of West development efforts focused on the integration of several areas. This is because the Indonesian territory of West already have enough fiber optic cable, but still not tertintegrasi. With fiber optic cable investment was expected to unite or integrate Western and Eastern Indonesia in 2009.

Selasa, 03 November 2009

how to correctly uninstall a program

Although the front-end or the part of the Windows system you see is quite simple and user-friendly, the operating system is quite complicated behind the scenes. And, a simple error or mistake can cause severe damage to your PC. Therefore, it is important that in the process of enjoying the computing experience on your Windows computer, you take proper care of it. For instance, one of the most important tasks that many computer users fail to do is to use legitimate procedures to uninstall programs from their computers. This is a very important task, because whenever you install programs on your computer several files and registry entries are added. And if you fail to uninstall your application using the correct method, many orphan files, registry entries, and programs shortcuts may be left behind. This orphaned data unnecessarily clutters your computer, and eventually leads it toward frequent system errors, freezes, and crashes.

In this article, we are going to introduce you to the proper methods that you may use to uninstall programs from your computer and prevent uninstall errors that occur due to incorrect removal processes.

Method #1: Use Add or Remove Programs

Most of the programs, especially the ones installed using the Windows Installer utility, add an entry in the Add or Remove programs list. Therefore, when trying to uninstall programs, this is the first method that you must opt for.

For example, if you want to uninstall office 2007 or remove a Norton product from your computer, you may perform the following steps:

  1. Open Start menu, and then select Control Panel.
  2. In the Control Panel window, select the Add or Remove Programs link.
  3. Scroll down the Currently installed programs list and select the option to uninstall Office 2007 or the Norton product you want to remove.
  4. Next, select the Change/Remove button to uninstall the selected program.
  5. Restart your system after the uninstallation process is complete to ensure that all registry entries and related programs are removed from the system.

Method# 2: Use Program Uninstaller

Although Add or Remove Programs is usually the most commonly used utility to uninstall programs, it is usually not efficient in performing a complete uninstallation, especially when you are trying to uninstall large applications such as Norton and Office 2007. This is the reason why separate uninstaller programs are available for these programs. For instance, you can download the Windows Installer CleanUp Utility and Norton removal tool on your computer to remove Office 2007 and Norton products from your computer.

Method #3: Use the Program Uninstall Option

Many programs do not add their uninstall option in Add or Remove Programs. The uninstall option for these programs is usually available in their program folder and a shortcut to it is usually added in the Start menu as Uninstall Program_Name. For instance, if you want to uninstall WinZip from your computer, open Start menu, point to All Programs, select WinZip and then select the Uninstall WinZip option.

Because programs add a number of files and registry entries, it is recommended that after you have uninstalled your program, you scan your registry and the hard disk for any left over information and remove it from the system. To remove unwanted and orphan entries from the registry, you may use a reliable registry cleaner tool to scan and remove these entries. Also, use the Disk Cleanup tool included in your Windows XP or Windows Vista computer to remove unwanted program files from the system.